Forget perfection. We want cake.

Old-fashioned Milk Chocolate Layer Cake liberally and imperfectly frosted 
with rich-yet-mellow Chocolate Buttercream.

This cake, in all its humble glory, is my gift to someone I love on his birthday. 
This cake is not about being a show-stopper.
This cake looks — and more importantly, tastes — like a cake. It does not look like a truck. Or a plane. Or a skyscraper. Or a stadium.
And therefore, this cake is not filled with or supported by non-cake-like elements popular on cake-decorating TV programs: PVC pipe, wooden dowels, rice-krispie-treat mounds and edible clay worked into any number of shapes in the sweaty palms of the competitors.
No, this cake is honest-to-goodness cake — made with butter, sugar, milk, chocolate, eggs and flour. And more chocolate. And more butter. Its layers are slightly uneven and the frost job is generous and imperfect.
In other words, this is how cake should be. In my book, anyway.
Milk Chocolate Layer Cake with Chocolate Buttercream
for the cake:
2 ounces unsweetened chocolate
3 tablespoons water
2 1/4 cups granulated sugar

3/4 cup (1 1/2 sticks) butter, softened
1 1/2 teaspoons vanilla
4 eggs, separated
1 cup whole milk
2 1/4 cups all-purpose flour
1 teaspoon cream of tartar
1/2 teaspoon salt
1/2 teaspoon baking soda

cocoa powder for dusting pans

for the buttercream:
7 ounces bittersweet or semisweet chocolate, melted (I used a combination of bittersweet and semisweet.)
3/4 cup (1 1/2 sticks butter, softened)
3 cups confectioners’ sugar
splash of vanilla
3-5 tablespoons whole milk

Preheat oven to 350 degrees.

Grease two 8-inch layer cake pans; dust pans with cocoa powder. Set pans aside.

Whisk together flour, baking soda, cream of tartar and salt. Set aside.

Combine 3 tablespoons water with unsweetened chocolate and microwave until melted. Be careful not to burn. (I microwave for about 15 seconds a clip and give chocolate a good stir every time I check the bowl.) Once melted, set chocolate aside.

Cream butter and granulated sugar in bowl of stand mixer for 4-5 minutes.

Meanwhile, beat 4 egg WHITES in separate bowl until fluffy white clouds. Set whites aside.

Add vanilla and 4 egg yolks to bowl with butter/sugar, mixing to combine. Stir in melted chocolate.

Add flour mixture to the party alternately with milk, mixing to combine.

Fold beaten egg whites into batter until thoroughly combined.

Pour batter into prepared layer cake pans and bake in preheated oven for 45-50 minutes. Cakes are done when sides pull away from edge of pans and cake tester (or toothpick) comes out clean after inserted into center of cake.

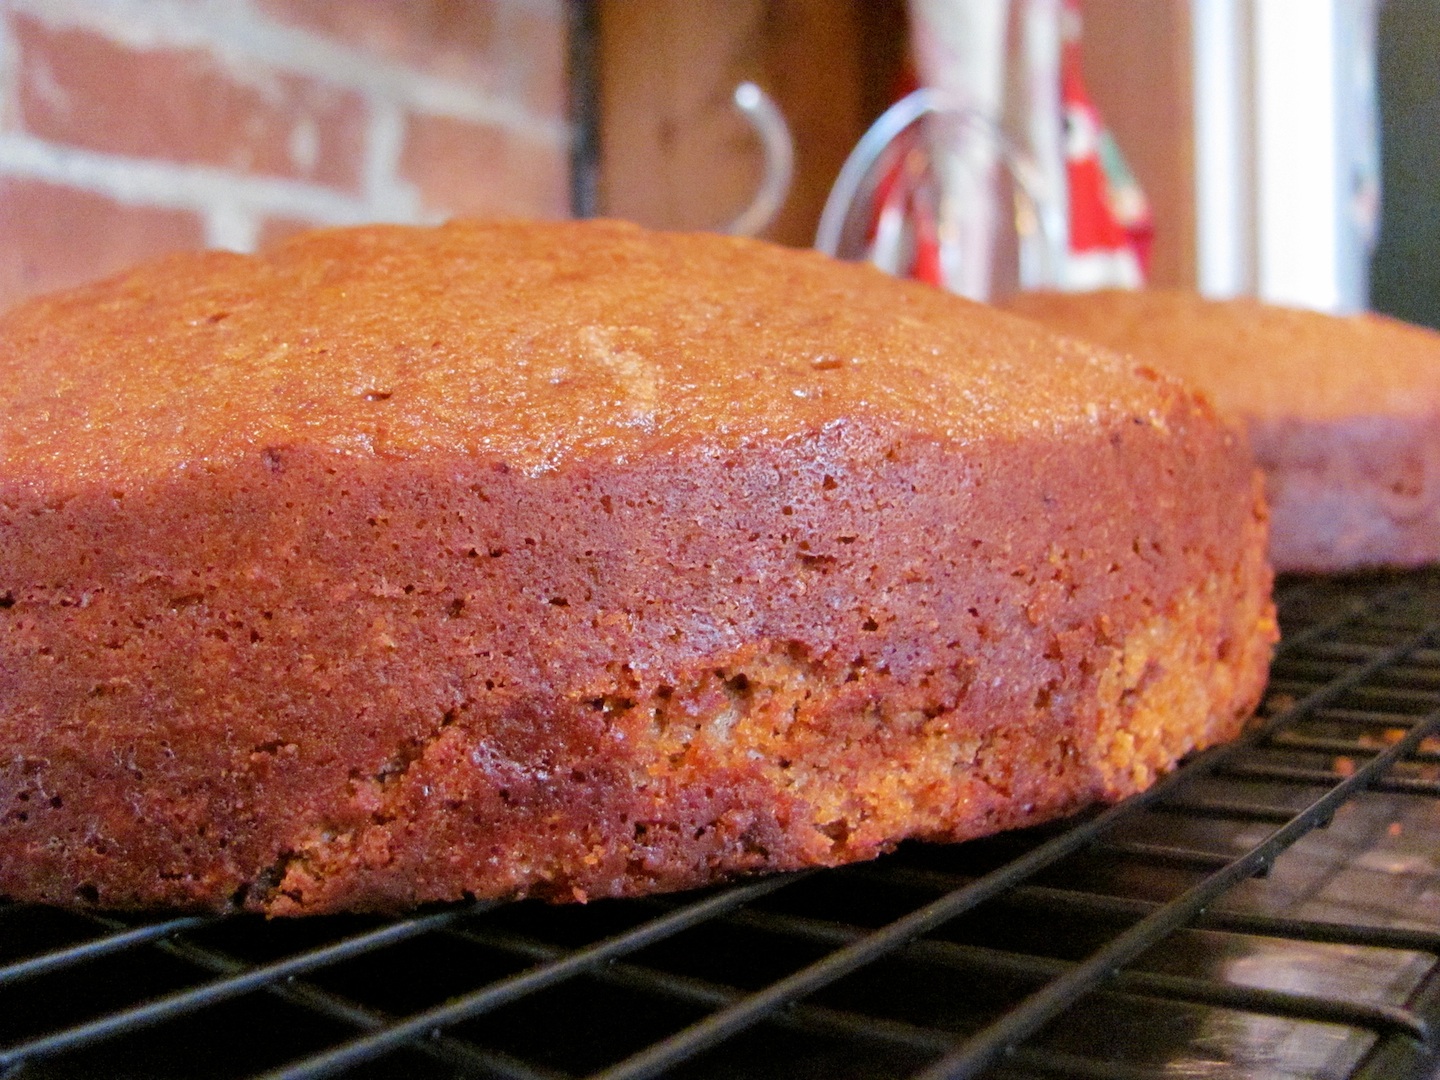
Place cakes (still in their pans) on wire rack to cool for about 10 minutes. Then invert cakes onto rack and let cool completely before frosting.

For the Chocolate Buttercream:
Beat softened butter with confectioners’ sugar for at least 5 minutes, scraping down sides of bowl every so often.

Add vanilla, melted chocolate and milk (a tablespoon or two at a time — honestly, I didn’t measure) and continue beating (like you mean it) — and continuously scraping down sides of bowl to catch any globular goodness — until you have a fluffy, spreadable, super-delicious buttercream.

Frosting the layers:
Lay 4 strips of parchment paper or aluminum foil on cake plate, where the edges of the first cake layer will rest. (You will remove these strips post-frosting.)

Place one cake layer atop strips.

Dollop a modest scoop of buttercream onto the layer, frosting in broad strokes to seal up any wayward crumb-age, then dollop a a generous scoop and liberally frost layer.

Place second cake layer atop first. Frost the top generously before frosting the sides of the cake. Don’t be stingy. Use all the buttercream to adorn the cake, swirling in carefree strokes as you go. (Again, this cake is not about perfection. The layers are not perfectly even, and the frosting shouldn’t be, either.)

Remove the strips of parchment.

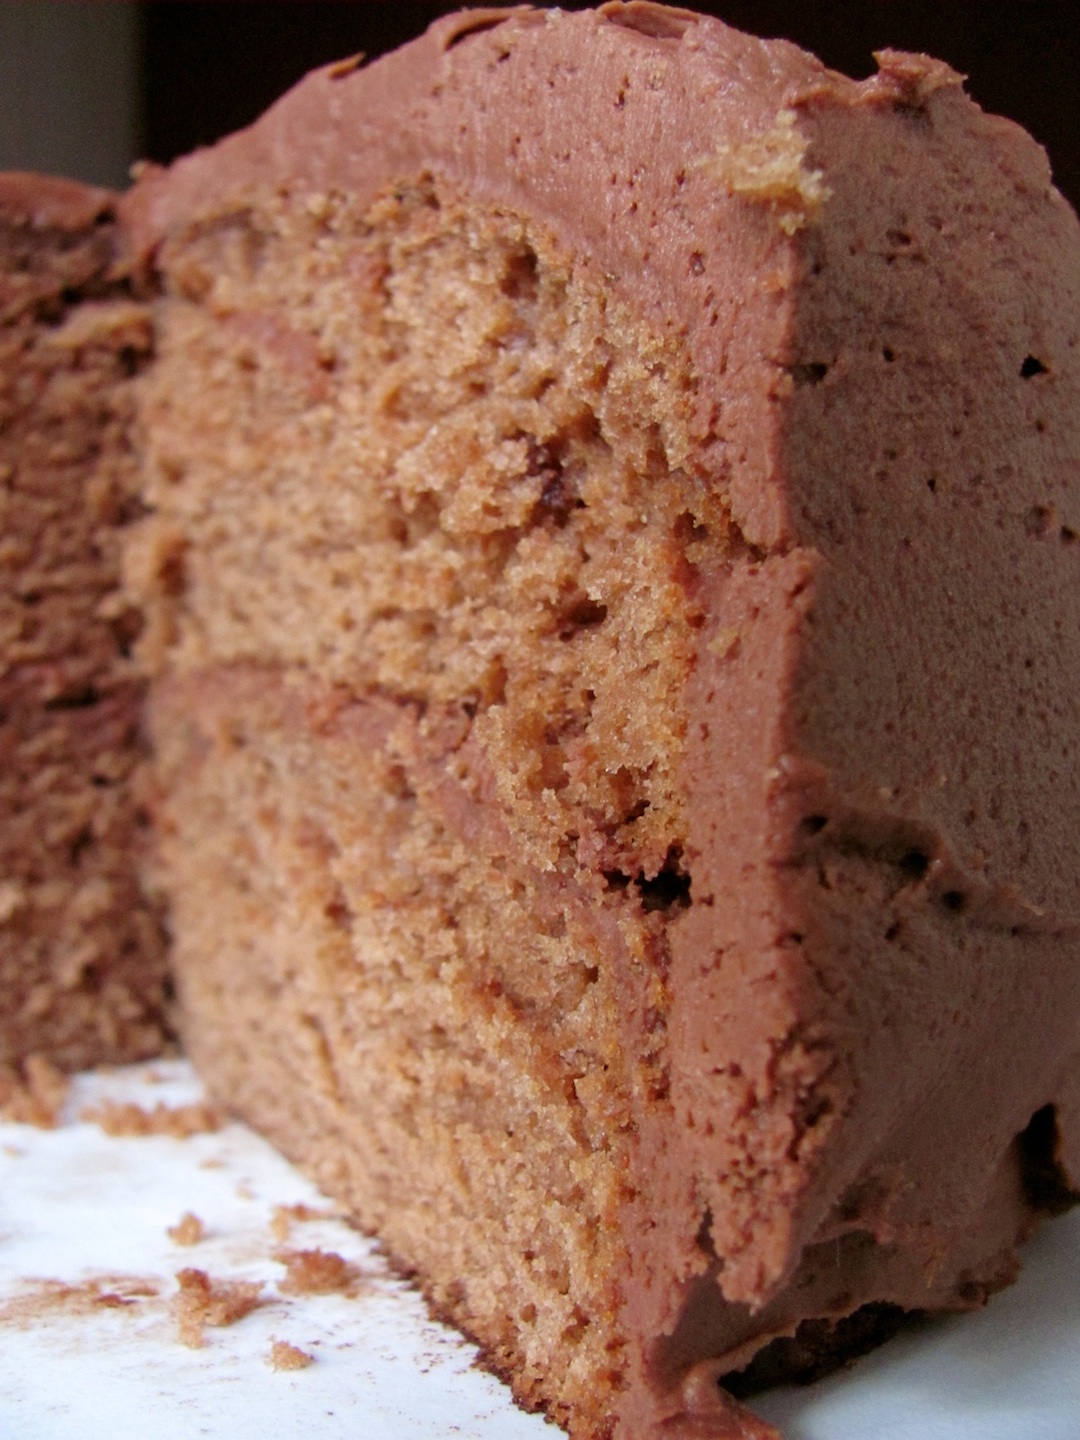
Gobble up a slice of moist perfection with a tall, icy glass of milk.

Doin' the Doodle

Cookie of the Week: Installment 4 
Cinnamon-sugary Snickerdoodles with a hint of nutmeg.


I hesitated before embarking on my Cookie of the Week series, mostly because I rightly suspected that I would screw up the rotation. This Cookie of the Week post is evidence of that — it is about five days late — but I hope you find it worth the wait.

For its name alone, the Snickerdoodle is one of my favorite cookies. But there is more to this cookie than a cool, goofy name. Snickerdoodles have history. They are a cookie jar classic. Some say their roots can be traced back to Germany (to the “schneckennudeln,” or snail dumpling). Hmmmm. I prefer Snickerdoodle to snail dumpling. … Anyway, they are the first cookies I learned to bake in my mother’s kitchen, and they quickly became my go-to cookies (the ingredient list is short and simple, and the goods are always on hand).

Snickerdoodles are basically sugar cookies that take a tumble in cinnamon sugar before hitting the oven. I add nutmeg to the dough to further add to that homey, big-hug, old-fashioned sugar cookie taste.

Snickerdoodle dough balls: post-cinnamon sugar tumble.

Snickerdoodles
1 cup (2 sticks) butter, softened
1 1/2 cups granulated sugar
2 large eggs
1 teaspoon vanilla
2 3/4 cups all-purpose flour
2 teaspoons cream of tartar
1 teaspoon baking soda
1/2 teaspoon nutmeg
1/4-1/2 teaspoon salt
cinnamon sugar mixture (for rolling dough balls — I used a couple of tablespoons of sugar and a couple of teaspoons of ground cinnamon)
Preheat oven to 350 degrees.
In small bowl, whisk together flour, cream of tartar, baking soda, salt and nutmeg. Set aside.
Beat butter and sugar in large bowl until light and fluffy. 
Mix in eggs and vanilla.
Add flour combo and mix until thoroughly combined.
Scoop dough by tablespoonfuls (or use a handy 1 1/4-inch scoop, like I did), form into balls and roll in cinnamon sugar mixture. 
Place balls on ungreased, cool-to-the-touch cookie sheets.
Bake in preheated oven for 10-12 minutes.
Leave cookies on sheets to cool for about a minute before transferring to wire racks to cool completely.
(Note: I ended up with about 2 1/2 dozen cookies, but my scoops tend to lean toward the fat and full. Feel free to make them a bit smaller if you’re looking for greater yield.)

Who Doesn't Love a Hybrid?

Cookie of the Week: Installment 3

Banana Oatmeal White Chocolate Chunkers are perfect for the lunchbox.

Bananas are a staple in this house. I may have mentioned this a time or two, or 40, before, but it really bears repeating. We eat them just as they are and in smoothies, but there are usually a few overripe ones kicking around. I show them no mercy. It’s to the oven for those slightly-past-their-prime bananas, to be gobbled up in muffins, quick bread and, today, cookies. (See the link in the index at left, cleverly titled “banana,” for older banana-related posts.)
These cookies, the third installment in my we’ll-see-how-long-this-lasts Cookie of the Week series, reflect my love of banana bread and chewy oatmeal cookies. They also reflect my freaked-out realization this morning that we are out of eggs. 
Eggs. Of all things. 
Anyway, I improvised, and they turned out as I had hoped. A little chewy and oat-riddled. A little banana bread-y. A lot yummy.
Banana Oatmeal White Chocolate Chunkers
2 medium very ripe bananas, mashed
1 cup (2 sticks) butter, softened
1 cup brown sugar, packed
1/2 cup granulated sugar
2 teaspoons pure vanilla
2 cups all-purpose flour
1 1/2 teaspoons ground cinnamon
3/4 teaspoon ground nutmeg
1/4 teaspoon ground cloves
3/4 teaspoon salt
1/4 cup boiling water
1 teaspoon baking soda
4 cups rolled oats
12 ounces white chocolate, roughly chopped (I used 3 Ghirardelli bars)
Preheat oven to 375 degrees.
In small bowl, whisk together flour, spices and salt. Set aside.
In large bowl, cream butter and sugars until fluffy. Add mashed banana and vanilla, beating well. Add flour mixture, but don’t mix in just yet.
Dissolve baking soda in water. Add this concoction with flour mixture to bowl with the rest of the party, and stir to combine.
Stir in rolled oats and white chocolate chunks.
Drop by rounded tablespoonfuls (or use a scoop, like I did) onto cookie sheets. Flatten mounds of dough with back of spoon/scoop.
Bake in preheated oven for 9-10 minutes. Leave cookies to cool on sheet for about a minute before transferring to wire racks to cool completely.

Lazy Sunday Cream Scones

Still warm from the oven.

I’ve always romanticized the rituals of tea making and tea taking. I have in my possession books that cover tea equipment and tea etiquette; tea history and tea customs; as well as, of course, old-school recipes (or “receipts”) for tea-friendly vittles, savory and sweet. My texts are riddled with delightful quotes like this gem: “I must further advise you, Harriett, … not to heap such mountains of sugar into your tea, nor to pour such a deluge of cream in; people will certainly take you for the daughter of a dairymaid.” —from “The Fool of Quality,” c. 1766-1770, reprinted in “A Dish of Tea: Recipes, History and Etiquette from Connor Prairie Museum.”

Poor Harriett.

A favorite teapot. It belonged to my grandmother, then my mother, and now me.
Both high-octane and herbal teas fill the first shelf of our kitchen’s most frequented cupboard, and tea has replaced coffee as my beverage of choice (for those of you who knew me in my all-day-coffee-swilling years, you may have read this in disbelief, but it’s true). But, sadly, for all of my romantic ideas regarding tea parties — and a collection of accouterments to make those tea parties even more smashing — I have yet to host an afternoon tea with guests beyond our own household. Why can’t I pull this off? I ask myself. When will I get it together? When will I finally use those oh-so-precious teapot placecard-holders purchased years ago at Crabtree & Evelyn for a not-so-bargain price?

Well, maybe I like the idea of a polite tea soiree more than the reality of what is apt to ensue should I embark on such a course. After all, my mother and her longtime friend Joan often enjoyed tea in the afternoon at our house, and these teas were anything but the proper affairs of my imagination: they drank their tea from sturdy mugs (forget dainty teacups) and left their mark with pinky-red lipstick; they didn’t nibble on dainty vittles (didn’t nibble on anything, as I recall); and there were, on several occasions, in these years before my mom finally gave them up for good … cigarettes. Sometimes, I sat at the kitchen table with them, eavesdropping and dodging second-hand smoke, but Joan wouldn’t tolerate this for long. Maryellen, why don’t you go find something to do? Your mother and I are trying to talk. Joan was not to be trifled with.

Anyway, beyond actual tea consumption, the only tea-related ritual I partake in at my house on a somewhat regular basis is the baking of scones. Unlike Joan and my mother, I like a nibble or two, or 10, with my tea. And there’s nothing easier or faster to make to satisfy my desire for a nibble than cream scones: tender, light and fluffy on the inside; a little crunch on the outside, thanks to a brush of cream and sprinkling of coarse sugar; and a not-too-sweet vehicle for butter and jam, lemon curd, whatever one fancies.

This recipe is as straightforward as it gets — no butter involved, just heavy cream — and the flaky scones are delicious plain or perked up with a cup of dried cherries, cranberries, blueberries (with lemon zest), or a handful of bittersweet chocolate chunks (the route I went today as that’s what I had on hand).

Lazy Sunday Cream Scones
(Yield: about 8 scones)

2 cups all-purpose flour
1 tablespoon baking powder
2-3 teaspoons granulated sugar
1 teaspoon salt
1 cup dried fruit, nuts or chocolate chunks (optional)
1 1/4 cups heavy cream

additional cream (or milk) for brushing (optional)
coarse sugar for sprinkling (optional)

Preheat oven to 425 degrees.

Sift dry ingredients into large bowl.

Stir in dried fruit, nuts or chocolate (if using, and yes, do this before adding cream).

Slowly mix in heavy cream (by hand) until dough is formed.

Roll or pat dough into a round on a lightly floured board. Cut into circles using round biscuit cutter or cut into triangles using a sharp knife.

Place scones on ungreased baking sheet, leaving each of them a few inches to groove.

Brush lightly with additional heavy cream or milk and sprinkle with coarse sugar (I use sanding sugar, but straight-up granulated is fine).

Bake in preheated 425-degree oven for about 15 minutes, rotating tray halfway through cooking time.

Remove scones from pan and cool on wire rack.

The tender, fluffy insides. 
These scones have only the slightest touch of sweetness (as it should be, in my book), and there is something very satisfying about the combination of simple breadstuff with bittersweet chocolate.

Sunshine in a Pan

Cookie of the Week: Installment 2


According to my sources, it is American Chocolate Week. That’s joyful news, yes, but, well, it’s always Chocolate Week around here, so I have decided to go in a different direction. A brighter, sunshine-y direction. A Mom’s Lemon Bars direction.

That’s not to say you won’t find me celebrating the wonders of chocolate this week (or anytime, for that matter). And if you’re reading this and disappointed that I am not highlighting chocolate in all of its decadent glory on this particular day, in this particular post, get thee to the index’s “chocolate” link at left (or click here) and find your pleasure among the recipes for Triple Chocolate Babycakes, Chewy Chocolate Chunk Cookies or, if you have some time on your hands, Mile-High Chocolate Cream Pie.

But for me, today, it’s about lemons. The weather has been dreary in Vermont this week (more snow, sleet and other anti-spring conditions), and I need a bar cookie with a burst of citrus to get me out of my funk. It also helps that the base of this cookie resembles shortbread, thanks to two sticks of butter.

I bake the bars only about once a year, but there is no good reason for this. They’re delicious, easy to make, and remind me of my mother — who gave me the recipe and also (inexplicably) made them only once a year.


Mom’s Lemon Bars
2 cups all-purpose flour
1 cup confectioners’ sugar
1/4 teaspoon salt
1 cup butter (2 sticks)

1 1/2 cups granulated sugar
4 large eggs
juice of 3-4 lemons, about 1/2 cup (3 worked for me — this time)
2 teaspoons lemon zest (optional)
1/2 teaspoon baking powder
2 tablespoons all-purpose flour

confectioners’ sugar to dust the top

Preheat oven to 350 degrees. Grease a 9×13-inch pan.

Beat butter, 2 cups flour, confectioners’ sugar and salt in large bowl until crumbly. Press this bumpy mixture into prepared pan as evenly as you can to form the base for the bars.

Buttery base is ready for its first go in the oven.

Bake base in preheated oven for about 20 minutes, until golden brown around the edges.

During those 20 minutes, make the filling: Whisk eggs with granulated sugar, fresh lemon juice, zest (if using), baking powder and remaining 2 tablespoons flour. Whisk until thoroughly combined.

Lemons await juicing.

When the base is ready, pour filling over top and return to the oven, baking another 15-20 minutes.

Dust with confectioners’ sugar and leave bars to cool completely on wire rack.

Cut into squares and enjoy the taste of sunshine (now, you’ll want to use a knife with some heft to it to press down through the base; these aren’t tricky to cut, but it’s easy to make the mistake of not slicing all the way through the layers; also, lift them out with a metal spatula). I like to store these in the fridge, but it’s not necessary.

Bright, tart lemon filling loves a dense, buttery cookie crust.

In the Cookie Jar: Back to Basics

Chewy Chocolate Chunk Cookies with bittersweet and milk chocolates

“Sometimes me think what is love, and then me think love is what last cookie is for. Me give up the last cookie for you.” — Cookie Monster
Oh, Cookie Monster. You are right about so many things.
Anyway, I’ve decided it’s high time I feature a cookie of the week here at Love & Scraps, and I figure there is nothing more appropriate for the first installment than classic Chewy Chocolate Chunk Cookies. These cookies are simple, but sublime, and riddled with both bittersweet and milk chocolate chunk-age.
Now, chocolate chip cookie recipes are about as basic as it gets. They are everywhere, much like Ubiquitous Banana Bread. I am not reinventing the wheel here, merely sharing my method for making one of my household’s cookie jar / lunchbox staples.

Chewy Chocolate Chunk Cookies
1 cup (2 sticks) butter, softened
1 cup brown sugar, packed
1/2 cup granulated sugar
1 tablespoon vanilla
2 large eggs
2 1/4 cups all-purpose flour
1 teaspoon baking soda
3/4 teaspoon salt (I like a bit more salt than is standard in most CCC recipes. If using unsalted butter, use 1 teaspoon salt.)
1 1/4 cups bittersweet chocolate chunks, or chips (I use a 60-70 percent cacao bar of chocolate, roughly chopped.)
1 cup milk chocolate chunks, or chips (I like the kid-pleasing sweetness once in a while.)

Preheat oven to 375 degrees. Have 2 cookie sheets at the ready (do not grease the sheets).

Whisk together flour, baking soda and salt. Set aside.

Cream butter and sugars until fluffy. Mix in vanilla and eggs, one at a time, until incorporated.

Work in flour mixture, in two or three batches, until combined. Don’t over-mix.

Stir in chocolate chunks, milk and bittersweet.

Drop cookie dough by hefty tablespoonfuls onto ungreased, cool-to-the-touch cookie sheets. (I use a scoop for this purpose that measures 1 1/2 inches in diameter. I like my cookies relatively uniform in size. Plus, they’ll bake more evenly if basically the same size.) Smoosh down dough a bit with the back of the spoon/scoop. Make sure cookies are somewhat evenly spaced with room to groove (we don’t want any run-ins).

Note: It may be tempting to slap dough onto trays relatively fresh from the oven, to keep things moving, but don’t do it. A hot tray messes with perfection.

Bake in preheated oven for 9 to 11 minutes, rotating tray at about the 6-minute mark. Cookies are done when set and golden brown around the edges but still a tad wet-looking in the middle. Remove from oven but leave on the cookie sheet for about a minute, then transfer cookies to wire rack to cool.

Dill: The Oft Neglected Herb

Dill and Onion Bread, fresh from the oven

I love dill, but I am not a faithful lover. In reality, I forget about its existence for months on end. It tends to take a backseat to the other herbs in my life: rosemary, thyme, basil, sage, cilantro … I neglect it. And then I regret it. And then I try to make up for my neglect by showering it with attention. It takes only one whiff of the weed to bring back savory memories of dill deliciousness: I love it in salads and with potatoes; mixed with sour cream as an impromptu dip or dressing for garden-fresh cucumbers; with fish; and kneaded into bread dough with its ever-faithful companion, onion.
This time of year, fresh dill is out of the question, in these parts anyway, but dried dill weed and dill seed have been lurking in the back of my cupboard for a while now, neglected but not completely forgotten. This weekend, wanting to take a gift to our Sunday dinner host who is trying to eschew the sweet stuff, I decided it was time for dill to shine. I baked off a loaf of old-school Dill and Onion Bread, then immediately regretted not making two so that we’d have one to scarf down at our house. Thankfully I had the presence of mind to bake another one this morning.
Dill- and onion-flecked dough is ready for its first rise.
Dill and Onion Bread
(eat as is, smeared with butter, or as sandwich bread)
1 (1/4-ounce) package active dry yeast
1/4 cup warm water
1 cup low-fat cottage cheese, room temperature
2 tablespoons butter, melted
2 tablespoons granulated sugar
2-2 1/2 teaspoons dill weed OR 2 teaspoons dill seed
1 tablespoon dried minced onion
1 teaspoon salt
1/4 teaspoon baking soda
2-2 1/2 cups all-purpose flour
Dissolve yeast in water.
In large mixing bowl, or in bowl of stand mixer, combine yeast/water mixture with cottage cheese, melted butter, sugar, dill, onion, salt and baking soda.
Stir in 1 cup of flour, then gradually add more until dough begins to take shape. Knead in remaining flour, by hand or switch to stand mixer’s dough hook, to form a stiff dough.
Transfer to lightly greased bowl, cover with a clean towel, and let rise in warm place for 45 minutes to 1 hour, until dough has doubled in size.
Punch down dough, shape, and transfer to a loaf pan. Let rise again for about 45 minutes.
The dough, after its second rise
Preheat oven to 350 degrees (a few minutes before dough has finished its second rise).
Bake in preheated oven for 30-35 minutes.
Remove from pan and let cool completely on a wire rack before devouring.

Somewhat Virtuous Sticky Sweetness

I love butter. I love buttery brioche. I love buttery brioche dough rolled up with brown sugar, spices and even more butter. I love to smell it baking in the oven, the brioche buns nestled together to better soak up any sticky, caramel-like secretions.

I also love zipping my pants and maintaining a reasonably sized muffin top.
So, this morning, I gave up my brioche fantasy for a while in favor of an experiment: a skinny rebirth of sorts for my Sticky Buns with Maple Icing. I made my buns with low-fat buttermilk roll dough instead of brioche (sniff) and, I have to tell you, the results weren’t too shabby. Of course, somehow I managed to soften nearly a half-cup of butter with which to smear the dough before adding the sugar and spices, but come on, it could have been far worse.
I baked 8 buns the traditional way, crammed together in a pan (see above), and another 10 I baked as stand-alones in a muffin tin (as seen in the opening photo and below).

If you’re willing to pass up layers of soft, ultra-rich (insanely fattening) dough in favor of a low-fat bun with all the other trappings of goo and sweetness, try this recipe.
Sticky Buns with Maple Icing
(recipe yields about 18 sticky buns)

1 tablespoons active dry yeast
1 1/2 teaspoons sugar
1/4 cup warm water
2 cups buttermilk (I never seem to have buttermilk in the house when I need it; often I substitute regular milk with a shot of vinegar: in this case, 2 tablespoons vinegar to nearly 2 cups skim milk)
3-4 tablespoons vegetable oil
1 1/2 teaspoons salt
4 1/2 – 5 cups all-purpose flour
1/ 1/2 teaspoons baking soda
gooey insides
1/2 cup (1 stick) softened butter (salted is fine)
1 1/4 cups packed brown sugar
2 teaspoons ground cinnamon
1/2 teaspoon ground cardamom
maple icing
1 1/4 cups confectioners’ sugar
3-4 tablespoons pure Vermont maple syrup
1-2 tablespoons skim milk

Combine yeast with water and sugar. Leave to rest and do its thing for about 5 minutes (bubbles will rise to surface).

Mix buttermilk with vegetable oil and salt over low heat until warm. Add this mixture to large bowl.

Sift together all-purpose flour and baking soda. Set aside.

Add yeast mixture to buttermilk mixture. Stir.

Add 2 1/2 – 3 cups of flour mixture, beating on medium-high speed to combine. (You’ll want to switch to a dough hook eventually if you’re using a stand mixer.)

Add additional flour in batches until dough starts to form and pull away from sides of bowl.

Transfer dough to lightly floured surface and cover with bowl. Let it rest about 15 minutes.

Uncover and knead with dough hook for about 5 minutes if using stand mixer, up to 10 minutes if kneading by hand, until dough is satiny and springy.

Preheat oven to 350 degrees. Grease 2 round cake tins or pie pans (or go the muffin tin route I discussed above).

Divide dough into 2 equal portions. Roll each into a rectangle.

Smear 1/4 cup softened butter all over each rectangle, then generously shower with brown sugar and spices.

Starting from the long side, roll up the dough rectangles jelly-roll style to form 2 logs. Slice each log into 9 buns.

I was a bit overzealous with my butter softening technique and ended up with vast pools of the stuff. Not bad. Just messy.

Place 9 buns into each pan. It’s OK if they don’t fit snugly; they will grow.

Bake in preheated oven for 15-20 minutes.

While the buns bake, mix confectioners’ sugar with maple syrup and skim milk to make icing.

Generously ice buns as soon as you remove them from the oven.

Eat them, being sure to scoop up the goo in the bottom of the pan.

Garlic, Garlic and More Garlic

I don’t understand people who don’t like garlic. Ditto for folks who don’t like onions. Or mushrooms. I try not to judge these people, but unless we’re talking severe food allergies, I can’t wrap my feeble mind around such a phenomenon. I mean, really, how do they even eat?
Garlic is a staple in our kitchen. I use it in just about all of our dinnertime creations. Often it’s a member of the chorus, but in my Chicken with Garlic Sauce, it is the star of the show.
We eat Chicken with Garlic Sauce frequently. It’s cheap. It’s easy. It’s healthy. It loves broccoli. But, above all and most importantly, it’s garlicky.
And, yes, this post is a clear departure from my usual flour/butter/yeast/sugar antics. I hope you don’t mind. While baked goods reign supreme on this blog, I will on occasion share what I make for dinner (see Glop, Chili), if only to make myself feel less butter-filled and more balanced.

Chicken with Garlic Sauce served with broccoli over steamed white rice

Chicken with Garlic Sauce is abundant among takeout joints. Unfortunately, I don’t recall how I first came to make it (hey, I am older than I used to be), so if I am not crediting someone out there with inspiring my version, my sincerest apologies.

Chicken with Garlic Sauce
(serve over white or brown rice)

1 tablespoon sesame oil, olive oil or veggie oil

2 boneless, skinless chicken breast halves (use more if you like, but I like this ratio of chicken to sauce, especially as I intend to eat mine with steamed broccoli and rice), cut into strips or cubed
4-5 cloves garlic, peeled and minced
1 1/2 cups chicken stock
3 packed tablespoons brown sugar
4-5 tablespoons soy sauce (reduced sodium would be healthier, I suppose)
1 heaping tablespoon all-purpose flour

Whisk together brown sugar, soy sauce, minced garlic, 1 cup of chicken stock. Set aside.

In separate bowl (I use a glass measuring cup), whisk remaining 1/2 cup stock with flour until it is free of lumps. Set aside.

Heat oil in large skillet over high heat. Add chicken pieces, lightly browning but not cooking them through. Remove chicken from pan (it is not fully cooked at this point, remember; you will finish cooking it in a minute or two).

Add mixture of brown sugar/soy sauce/garlic/stock to hot skillet, whisking as you do so. Return chicken pieces to skillet.

Cover and reduce heat to simmer for 12-13 minutes.

Again, remove the chicken from the skillet but leave the sauce; use a slotted spoon. Add the flour/stock combo to the skillet.

Bring sauce to a boil to thicken, whisking all the while.

Return chicken to pan, coating it with sauce.

Garlicky goodness

I serve this over steamed white rice, with lots of steamed broccoli to help soak up the sauce. This recipe feeds two hungry, hearty eaters.

Ubiquitous Banana Bread

Bananas and bittersweet

Despite the fact that banana bread and banana bread recipes seem to be everywhere, all the time, I will share mine here, if for no other reason than for the sake of full disclosure: I bake a batch of banana bread at least once a month, so how could I maintain a baking/random ramblings/food love blog without a banana bread post?
Not so attractive at this point

The man in my life eats a banana every morning. Bananas are tasty and good for you, after all. Still, he can’t keep up with supply, and several mushy bananas find themselves in the deep freeze awaiting their fate at the hands of my potato masher and 350-degree oven. Some end up in muffins, others in quick bread studded with bittersweet chocolate chunks.
So, if for some inexplicable reason you can’t find your own trusty, go-to banana bread recipe, have a go at this one. It makes four (4) mini-loaves, which I find more manageable than full-size loaves for our household of two.
Banana Bread with Bittersweet Chocolate Chunks
4 large over-ripe bananas, mashed
3 large eggs
1 1/2 teaspoons vanilla extract
1/4 cup plus 2 tablespoons milk
1/3 cup plus 3 tablespoons oil
1 1/2 cups granulated sugar
3 cups all-purpose flour
3 teaspoons baking powder
1 1/2 teaspoons ground cinnamon
scant 1/2 teaspoon ground nutmeg
scant 1/2 teaspoon salt
3/4 cup bittersweet or semi-sweet chunks (feel free to add chopped walnuts or pecans, instead of or in combination with the chocolate)
Preheat oven to 350 degrees. Lightly grease and flour baking tins (my mini-loaf pans are about 3 x 5 1/2 inches).
Whisk together dry ingredients. Set aside.
Mix mashed bananas with eggs, sugar and wet ingredients, combining thoroughly.
Fold wet ingredients and chocolate chunks into dry to combine, but don’t overwork your batter.
Fill prepared tins about 3/4 of the way and bake for 35-40 minutes.
Leave in pans to cool for about 5 minutes before transferring to wire rack to cool completely.
When cool, wrap in layer of plastic wrap and layer of aluminum foil. It’s best to leave them alone for about a day before scarfing. Also, these breads freeze well.
P.S. Some folks use mini-chocolate chips in their banana bread, if they use chocolate at all. This method is not for me. I like to go whole hog and prefer an infrequent burst of bittersweet to overabundant mini-chippage.